How to Download Fonts to Use with Silhouette, Cricut, and Other Design Software
These steps are for downloading a font on a PC. I am running Microsoft 10. The process may look a little different on your computer. Essentially, you just need to download the font, unzip the file, open the font file, and install it, but these steps and photos below may help you visualize the process of installing fonts to use with your Silhouette, Cricut, or other design software.
**This post contains affiliate links. When you click these links I may make a commission on purchases made through those links. As an Amazon Associate I earn from qualifying purchases.**
It is important to have proper security measures in place such as antivirus and threat protection software, before downloading any files from the internet.
If you are looking for an epic list of where to find FREE and Cheap Commercial Use fonts, click here
- Find the font you want. If necessary, add the font to your cart and go through the checkout process. Some sites have you do that even if the font is free, which is a good thing because then it is usually stored on your account and you can re-download it in the future if needed. The designer may also update the font or add to the file so you can access the updated version there too.
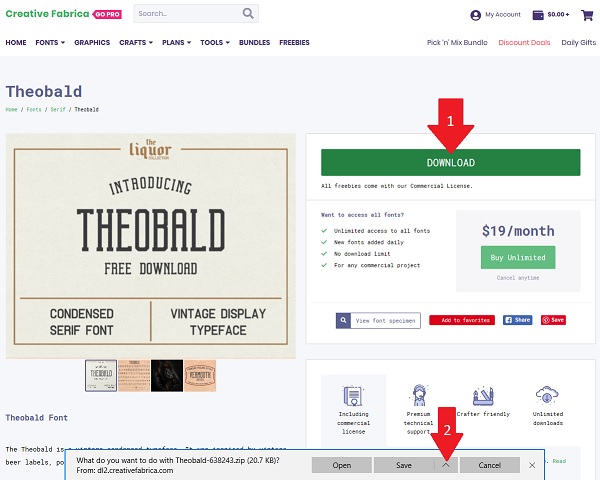
The font I am using in this example is from creativefabrica.com, it was free, and it is called Theobald. - Click the download button (this may have to be accessed through an email or your account). You should be given the option to open or save. Choose Save and Save As.

- Choose the location you want to store your fonts. (I use this external hard drive so I have a backup just in case.) It is a good idea to have a folder just for fonts.
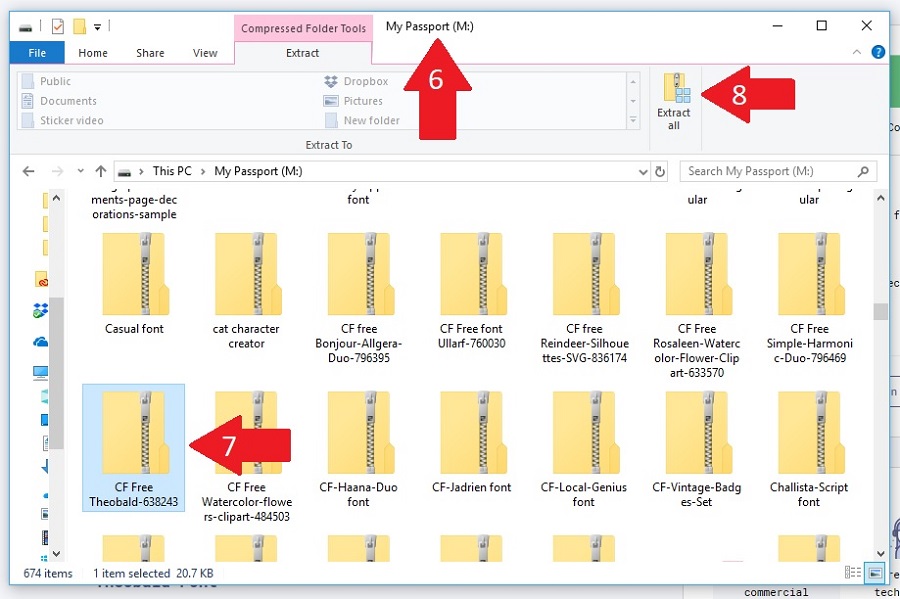
- I rename the file (not the font) adding the site I got the font from and if it was free. Since I got this font free from Creative Fabrica and the font was named Theobald-6382, I name the file CF Free Theobald-638243.
- Click save.

- Go to the location where you saved the file.
- Select the zipped file.
- Click Extract All

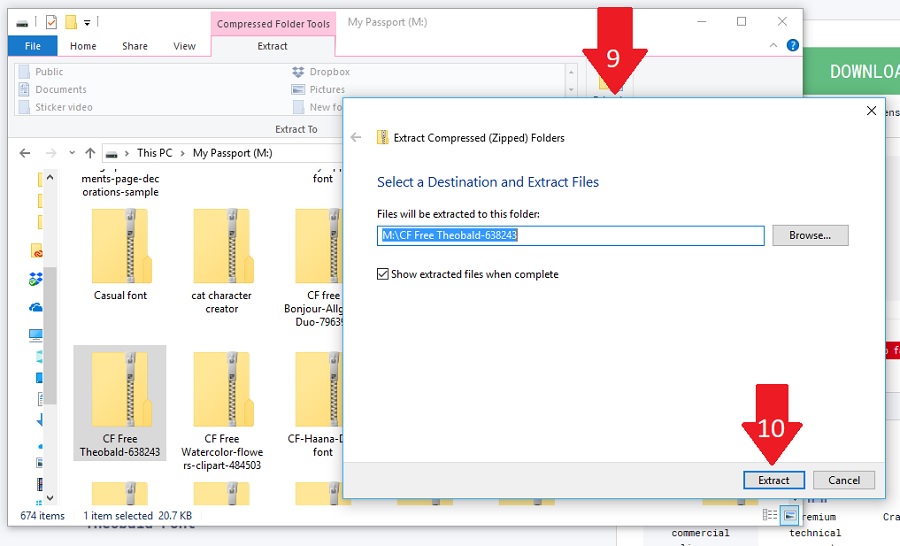
- A box will open asking you to select a destination where your unzipped files will go. This is typically auto filled with the folder your zipped font is in. That is ok.
- Click Extract.

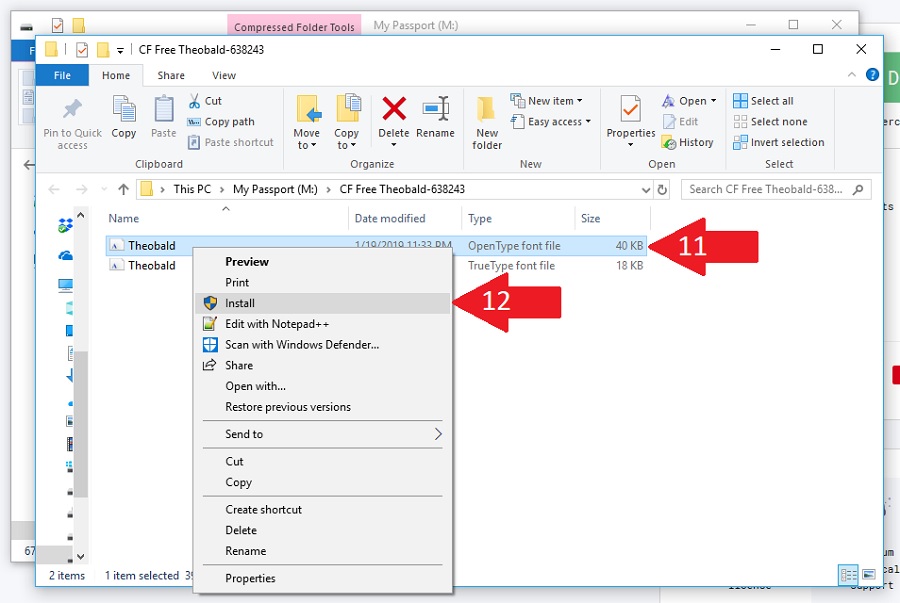
- The files will be extracted but left together in an unzipped folder (you can delete the zipped folder if you would like, after you confirm the files are in the unzipped folder). Right click the OTF file if it is available (if not, TTF is fine). OTF is an OpenType Font format is the newer version of font file and is the file that typically includes extra glyphs if there are any. TTF is TrueType Font Format.
- Click Install.

- A box will open saying Installing Fonts and will then disappear. That is it, the font is installed. If you have any software open, you need to close it and re-open it before the font will show up as an option. Sometimes (I think if you install the font without extracting it), when you right click on a font you aren’t given the option to install but the option to open. Click open and the font preview will open. Click Install and then close the box.

What if you downloaded fonts and they aren’t showing up in Silhouette Studio?
There is a known issue with Microsoft Windows permissions and Silhouette Studio. A recent update can cause fonts to go into a folder waiting for permission before they can be used. I have not had this happen yet, but a lot of Silhouette users have. Here is how to check if this is happening to you.
- On your keyboard, press the Windows key and the R keys at the same time.
- The Run box will open. Type %localappdata% into the space and click OK.
- Open the Microsoft folder.
- Open the Windows folder.
- Open the Fonts folder (if you don’t see a fonts folder, then you do not have any fonts awaiting permission to use)
- Right click on each font and select “Install for all users”.
How to save space on your computer when downloading fonts
If you are concerned with using up too much space on your computer by installing a bunch of fonts. You have a couple of options.
One option, if you have a PC, (not sure about Mac) is that you can choose to install a shortcut to a font file instead of installing the file itself.
Here is how to create shortcuts to a font instead of installing on your PC
- Go into the Control panel
- Under Appearance and Personalization go to Fonts
- Go to Font settings
- Click the box under Installation settings to allow to install the shortcut.
If the font becomes unavailable though, you might not be able to use the font, however, you can still install the font from the downloaded file later if you want, if you have it saved.
Use a font manager to save space on your hard drive
Another option is to use a font manager like Nexus Fonts. You can install all your fonts to your computer and use Nexus as a font viewer but, if you want to use it as a font manager, do not install your fonts after you download them. Put your downloaded font files into a single font file or divide them by style, project, etc. and add the file to the library of Nexus Font. You will be able to use your fonts in your design software while Nexus Font is open and once you close it, the fonts will go back to being uninstalled. A font manager is very helpful with viewing, organizing, and loading and unloading fonts if you put in the time to get it going.
It is pretty quick and easy to download fonts. I bet you will be hooked after your first one. Give it a try and start stepping up your designs.
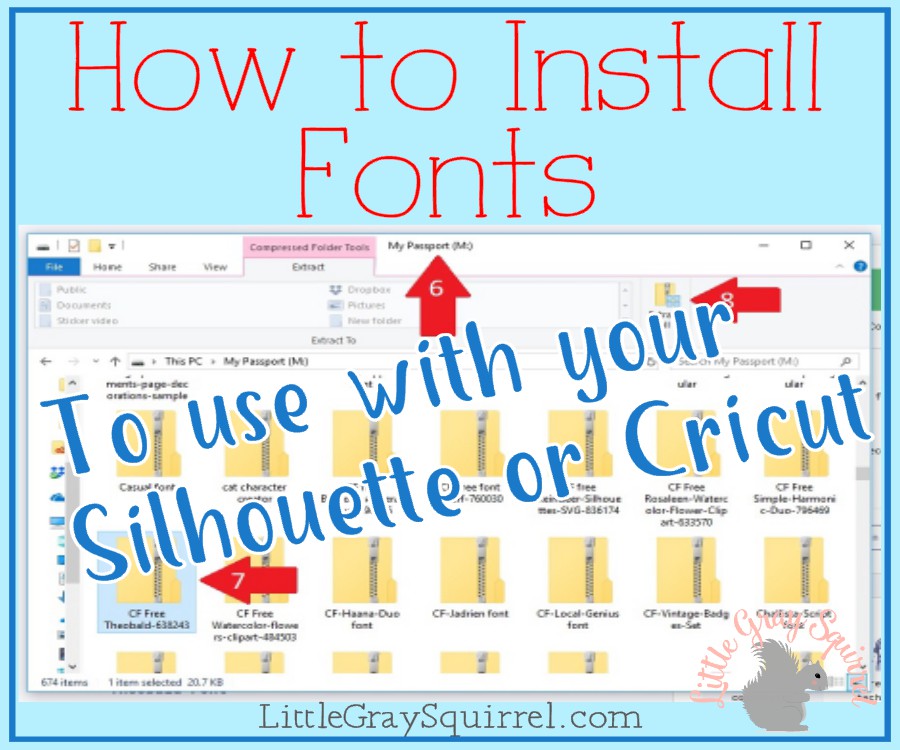
Pin this image to share with others!

If you want to build your font library, sign up for my mailing list to be notified of free, cheap, and got to have ’em fonts, files, and creative design resources with commercial use every week.
[mailerlite_form form_id=4]I would love to hear your favorite font to use, or a font on your wish list.
Happy Downloading!
Megan
