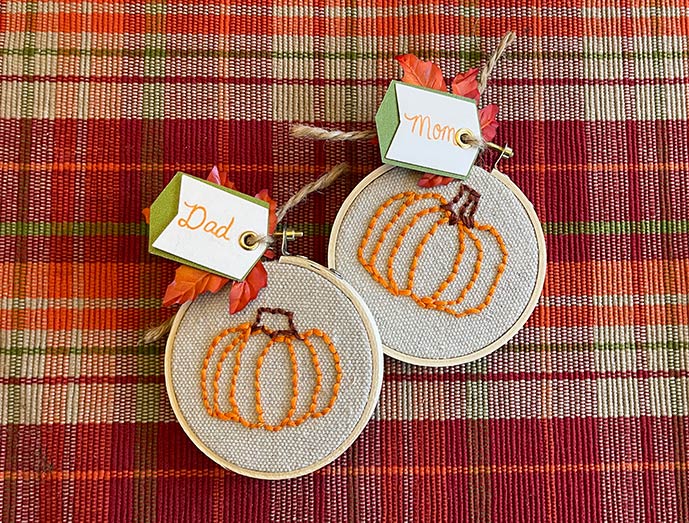
Table Placeholder for Fall
Make this simple fall place holder for your Thanksgiving table or Fall Wedding.
Using a 3″ embroidery hoop and needle punch, this DIY project is quick and easy.
**This post contains affiliate links. When you click these links I may make a commission on purchases made through those links. As an Amazon Associate I earn from qualifying purchases.** Please read our disclosure policy for more information.
Thse placeholders for your table are quick and easy for a small get together but can also be done production style for a pretty and inexpensive decoration for a wedding or large gathering (when those are allowed again).
The designs are only limited by your imagination. You could make trees, stars, snowflakes, any design you wish.
Watch the video for step by step instructions or read through the steps below.
Find a list of the supplies you might need in the box below.
DIY Needle Punch Table Placeholders for Fall

Materials
- 3" Embroidery hoop
- 6" Square piece of canvas fabric
- Pencil
- Needle punch
- Embroidery floss (orange and brown) If you buy the needle punch kit above, it comes with floss.
- Scissors
- Tacky glue
- Popsicle stick
- Cream colored cardstock
- Lia Griffith Frosted Craft Paper succulent pack
- Fiskars tag punch with eyelets
- 1/8" hole punch
- Artificial leaves
- Jute twine
- High temp hot glue gun and glue sticks
- Gel pens
Instructions
- Gather the supplies
- Load the embroidery floss into the needle punch tool
- Trace a circle onto the cream colored cardstock using the outside of the embroidery hoop as a template.
- Cut out the cardstock circle and set aside.
- Separate the hoops, place the fabric over the solid inner hoop, place the outer hoop over the fabric and press down over the solid hoop. Tighten the knob on the embroidery hoop.
- Draw your desired shape with a pencil. For Fall you could draw pumpkins, leaves, acorn. For winter you could draw tree, snowflake, star... the possibilities are endless.
- Select a spot on your line drawing and push the loaded needle punch through the front of the fabric.
- Grab the tail of the embroidery floss and pull it through to the back of the fabric.
- Hold the tail of embroidery floss against the back of the fabric with your finger, pull the needle out of the fabric.
- Turn the tip of the needle so the opening of the needle is facing away from your previous stitch.
- Move the tip of the needle about 1/16"-1/8" down your line and push it back through the fabric.
- Slowly pull the needle out and place your finger on the loop that has now formed on the back of the fabric.
- Hold the floss in place while you continue to punch along the line drawing.
- When you need to move to a different part of the design, push the needle all the way through to the back and snip the thread connected to the needle. Then pull the needle punch out.
- Grab the end of the floss and pull it out the tip of the needle a little bit, punch it through the fabric on the next part you want to work on. Grab the tail of the floss, hold it in place, and continue punching.
- If you use different colors, just snip the floss on the back side, remove the needle punch, reload it with a different color and begin punching again.
- When you are finished with the needle punching, trim off any long tails of floss from the back.
- Squeeze a line of tacky glue along the loops and floss on the back of the hoop. Gently brush the glue across the floss with the popsicle stick. Let dry.
- Heat up your glue gun.
- Run a short bead of hot glue along the embroidery hoop on the back between the fabric and the hoop.
- Pull the fabric tightly towards the back center of the hoop so it is nice and flush with the hoop.
- Add more hot glue and work your way all around the hoop, pulling the fabric tightly over the hoop.
- Place the cardstock circle on the back of the hoop to make sure it is the right size, trim it a bit if needed.
- Hot glue around the fabric, just inside the hoop ring and place the piece of cardstock. Turn the hoop over and press down with even pressure so the piece of cardstock is secure and flat as possible.
- Use the tag punch to cut the Frosted Craft Paper and a piece of cream colored cardstock, write the name on the cream colored paper using a gel pen (you may also write the name after it is assembled but the eyelet may make it a little harder to write on).
- Punch the eyelet hole, insert the eyelet, and press the eyelet into the tag with the punch.
- Punch a hole in the leaf.
- Feed the twine through the hole from the back of the leaf, through the eyelet from the back of the tag, through the opening in the top of the embroidery hoop. Tie a double knot in the twine and trim to the desired length.
Notes
Always turn the embroidery hoop, not the needle. Keep the needle punching in the same direction for smooth punching.
I would love to see any projects you make that you have learned about from my blog.
Tag me on Instagram @littlegraysquirrel if you share them.
Best,
Megan
[mailerlite_form form_id=9]